

Videos are shaping the way we express ourselves and communicate. People create vlogs to share with friends and family, impart experience and knowledge on YouTube, or promote their businesses online. Video editing software is either too easy or too complex to understand the workflow, depending on your editing needs.
If you’re new to video editing, you might wonder which free video editing software is the best option for beginners since many high-quality editing tools are accessible. We would recommend you to start with some powerful editing software, but with an easy-to-use interface, such as Wondershare Filmora. Its simple learning curve allows you to easily get started, and its advanced features will be suitable when you have better editing skills.
With a user-friendly interface, drag & drop feature, and a wide variety of advanced video editing tools, Filmora Video Editor makes professional video editing simple. Moreover, it offers a variety of artistic aspects that you may utilize to distinguish your videos, including a rich set of effects, visual overlays, text, and titles etc. All in all, it is for all content producers, including gamers, educators, freelancers, makeup artists, chefs, etc. It simplifies the process of producing content.
Download and Install
You can download the latest version of this editing software to take advantage of incredible new features like Speed Ramping, Instant Mode, Auto Reframing, Motion Tracking, AI Portrait, Masking, dynamic Split-screen, and Preview Render.
This editing software is compatible with PCs running Windows 7 and later and macOS 10.12 and later. On Windows, the downloaded file is less than 1 MB, whereas, on Mac, it is about 2.5 MB. You can click it to begin installing.
For the ordinary home user, beginner, or semi-pro, Filmora video editor is a superb option compared to other pricey and advanced video editing software.
Launch the video editor on your PC or Mac
To begin editing a new video, double-click the software icon whenever you’re ready. The software’s welcome page will display and prompt you to open an existing project or start a new one. You can quickly modify your clips and rearrange clips in sequences whenever you like by dragging and dropping your media files into the timeline.
Media Import
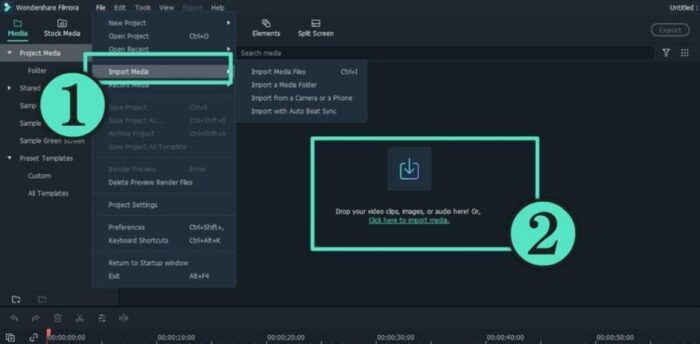
Nearly all video file formats are supported by the software, including those made using cameras, smartphones, and professional recording equipment.
Click the Import button in the top left corner of the video editor, pick the Import Media Files option, and then go to the directory on your hard drive where the material you need to edit is located. Click the Import button after selecting the video, audio, or image files you want to utilize in your project.
You will also see the option Import with Instant Cutter Tool in the Import menu. The Instant Cutter Tool is meant to make 4K and any other big-file cutting as quick and straightforward as possible. And it can quickly edit films captured by action cameras. Easily improve your videos with the lens correction tools or the Fish Eye Distortion effect.
Basic video editing: Cut / Split / Trim Videos without Quality Loss with Automatic Scene Detection
There are always some irrelevant and unnecessary parts in the video. And the only way to make your video look great is to remove the unnecessary parts.
1. How to Split Video Clips and Use Scene Detection?
There are two methods to divide a huge video into many clips: the first is to cut the video directly, and the second is to use Scene Detection.
To directly divide a video, move the pointer to the desired location, click the scissors symbol, or right-click the movie and choose “Split.”

Video can be split using Scene Detection. Right-click the media file in the library and pick the “Scene Detection” option.
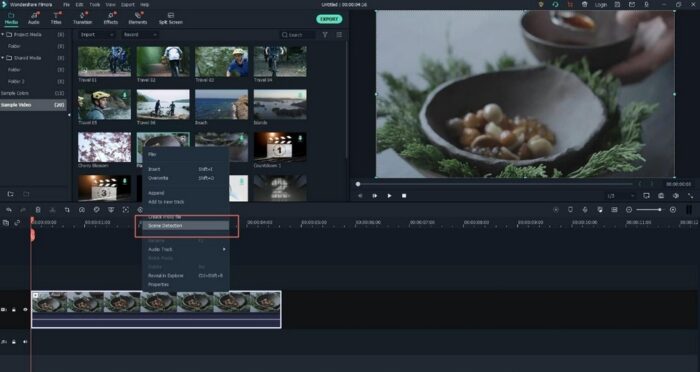
Click the “Detect” button in the pop-up window to have this editing software detect the scenes. Once the detection is complete, you can choose the undesirable scene and click “Delete” to eliminate the clip. Then, click “Add to Timeline” to add the scenes for future modification to the Timeline.
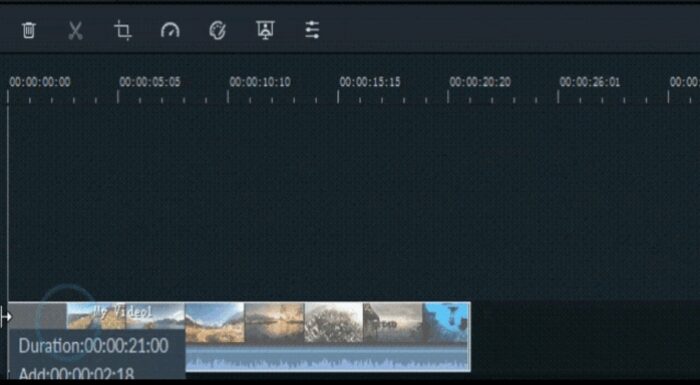
2. How to Trim Video Clips?
Drag the video to the timeline. Move the mouse to the beginning or end of the video until the pointer appears. After that, slide the cursor ahead or backward to trim the start or finish of the video.
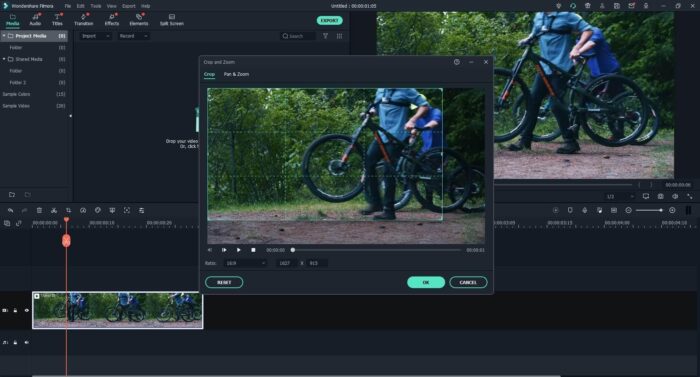
3. How to Crop Video Clips?
Click the “Crop and Zoom” button above the timeline or right-click on the video to get the “Crop and Zoom” menu option. There will be a new window opened.

In the new window, verify the video’s frame: 16:9, 9:16, 4:3, 1:1, or design a frame, then drag it over the movie to modify the aspect ratio. Afterward, click “OK” to save the changes.
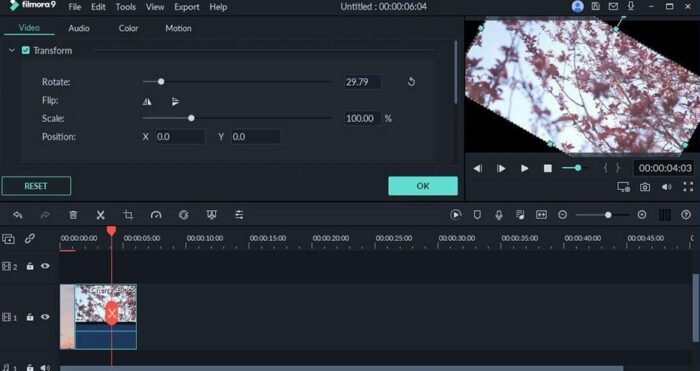
4. How to Rotate Video Clips?
Have you ever taken videos with your phone in the incorrect orientation? No worries! This video editor allows you to rotate or flip videos to the correct angle.
- Double-click the video clip in the timeline to access the panel for video editing.
- Expand the “Transform” option and find “Rotate.” Here, you may rotate your movie by moving the slider or entering a certain degree in the corresponding field.
- To flip the video, you may alternatively click “Flip horizontal” or “Flip vertical.”
- View the rotating effects and click “OK” to save the modifications.
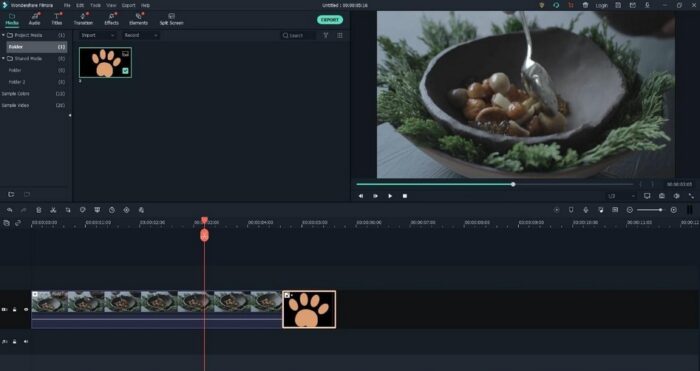
5. How to Combine Video Clips?
This editing software enables you to merge various video clips and photographs into a video. It is easy to combine films and images into a single file; drag and drop video clips and pictures into the timeline sequentially. When exported, they will merge into a single video.
Add video effects, transitions, overlay, and titles
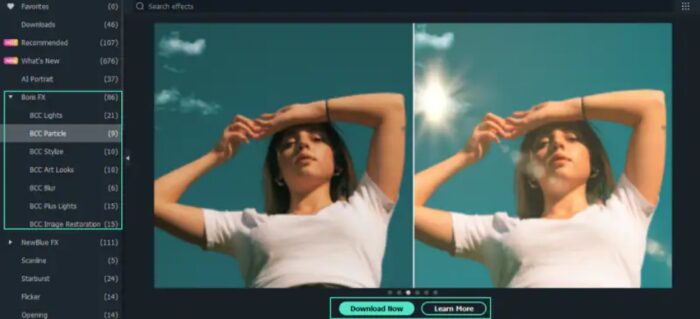
The program includes a rich library of color video presets, sample countdown videos, royalty-free music tracks, sound effects, and sample color videos. (Please note that the audio collection is for personal use only.) You can use the built-in stock media in the software to avoid downloading from other sources, or you can get access to professional plug-ins like Boris FX and NewBlue FX. From there, you can add advanced visual effects to your videos.
Your videos will seem even more gorgeous thanks to its extensive selection of transitions, titles, lower thirds, subtitles, opener intros, and end credits. Additionally, you get remarkable effects, including filters, overlays, face-offs, mosaics, picture masks, and tilt-shift effects.
AI Portrait
The AI Portrait feature can detect human faces automatically, and you will be able to separate them from your surroundings. The AI portrait can be a great way to remove the background from the video with the help of AI stickers.
It can be a good option for those of you who are not comfortable with the Chroma key or green screen technique. It can be an excellent feature for games, YouTubers, and vloggers. It can also be a great option to add extra features to your videos, such as glitches, noise, and much more.
Exporting and Sharing videos
You can save and share your films with the world using a variety of ways in this software. You can immediately post them to Vimeo or YouTube. For the iPhone, iPod, iPad, PSP, and many other devices, it can also store films in various video formats, including MP4, MPEG2, FLV, and HD videos. Additionally, it has a built-in DVD tool that allows users to burn data onto DVDs for playback on TV or a home DVD player.
Conclusion
For amateur and intermediate video editors, Filmora is the most acceptable video editing program for Mac and PC since it offers tools and features that let you produce films in various genres. Although it takes years to become an expert at video editing, you can learn enough about the process in just a few months. It takes perseverance, a never-ending desire for knowledge, and the ability to combine video fragments into compelling tales to become a great video editor.


